- Tue Sep 10, 2013 6:47 pm
#3684452
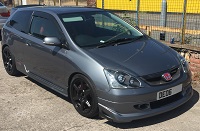
Starting fresh with my ep3.
Taken it off the road now as im fortunate enough not to have to use it as a daily driver for awhile. And I want to get her the way I want her. Cutting a long story short I've had her a year and now I need to make her my own and rebuild her to a decent spec now I don't have anyone else ruining her.
Spec so far
Engine
AEM CAI
Injen Hydroshield
Blue cam cover
Spoon socks (50bhp )
)
Interior
Wrapped dash/handles in baby blue carbon
Vtec light in dash
Purple centre console lights
Blue seat centres
Exhaust
2.5" custom b pipe
Exterior
6000k H.I.D's
L.E.D number plate lights
L.E.D side lights
Jazz washer jets
Rear tinted windows
Blue brake calipers
Baby blue "R" sideskirt decal
Carbon blue front and back "R"
De badged "civic"
Random silly stickers in baby blue
Black headlights
Chassis and suspension
Bridgestone re04 tyres front
Nexan 3000 rear
Skunk2 heavyweight gear knob
I.C.E
Alpine headunit
Vibe slick 6x9's
Active 12" sub
Few pics through the last year
Rolling roaded at euro spec completely standard
After a years worth of driving between me and ex she is worn, Tyres are shagged, Brakes squeal when applied and especial when In reverse there so bad, 2nd gear is always a pain at high revs, rear shocks are shagged,
so I have compiled a off the road to do list which gets longer and longer. The list is to get her back to normal so I can start building her into what I want. So phase one starts as follows
To do (phase 1)
Cosmetic
Custom dipped dash and surrounds
Dash lights back to oem or decent blue
Clean up exterior (wash, polish, wax, repaint head lights, adjust wind deflectors)
Remove stickers
Strip full Interior and steam clean, hoover
Chassis and suspension
Brake discs and pads all round (pagid for now)
Change rear shocks (standard)
Tyres ( Bridgestone re04)
Replace snapped drop link
Engine
Full service (hemp shortie filter, magnetic plug, oil, coolant, NGK iridium sparks)
Gearbox oil (mtf-3)
Clutch change (oem or stage 1?)
Get bren to do a cam cover
Will update as I go
How she stands
Right to get started I done the snapped droplink
As it was
New one
Tyres where ruined so changed the fronts for Bridgestone re04 and rear to nexan3000
How bad they were
Then I stripped her out for a BIG clean. Everything was removed except the main dash. I steam cleaned everything, hooverd everything and used the appropriate cleaning materials on floor and plastics. Even seats where done. Re wired all the shabby halfrauds wiring that had been done by previous owner as well.
Dog eaten it all!!!!
Stripped ready for cleaning (apart from carpet)
Run wires accordingly for stereo
iPod lead through centre
Cleaning and replacing
Half and half
Cleaning (love the slippers)
Replacing
Cleaned
All interior back in, only things to do Interior wise now is dash and door handles
Outside polish and wax (detail to be done by a detailing company when back on road)
Cleaning
Cleaned
More to come. Thanks for looking. Comments welcome
Taken it off the road now as im fortunate enough not to have to use it as a daily driver for awhile. And I want to get her the way I want her. Cutting a long story short I've had her a year and now I need to make her my own and rebuild her to a decent spec now I don't have anyone else ruining her.
Spec so far
Engine
AEM CAI
Injen Hydroshield
Blue cam cover
Spoon socks (50bhp
Interior
Wrapped dash/handles in baby blue carbon
Vtec light in dash
Purple centre console lights
Blue seat centres
Exhaust
2.5" custom b pipe
Exterior
6000k H.I.D's
L.E.D number plate lights
L.E.D side lights
Jazz washer jets
Rear tinted windows
Blue brake calipers
Baby blue "R" sideskirt decal
Carbon blue front and back "R"
De badged "civic"
Random silly stickers in baby blue
Black headlights
Chassis and suspension
Bridgestone re04 tyres front
Nexan 3000 rear
Skunk2 heavyweight gear knob
I.C.E
Alpine headunit
Vibe slick 6x9's
Active 12" sub
Few pics through the last year


Rolling roaded at euro spec completely standard


After a years worth of driving between me and ex she is worn, Tyres are shagged, Brakes squeal when applied and especial when In reverse there so bad, 2nd gear is always a pain at high revs, rear shocks are shagged,
so I have compiled a off the road to do list which gets longer and longer. The list is to get her back to normal so I can start building her into what I want. So phase one starts as follows
To do (phase 1)
Cosmetic
Custom dipped dash and surrounds
Dash lights back to oem or decent blue
Clean up exterior (wash, polish, wax, repaint head lights, adjust wind deflectors)
Remove stickers
Strip full Interior and steam clean, hoover
Chassis and suspension
Brake discs and pads all round (pagid for now)
Change rear shocks (standard)
Tyres ( Bridgestone re04)
Replace snapped drop link
Engine
Full service (hemp shortie filter, magnetic plug, oil, coolant, NGK iridium sparks)
Gearbox oil (mtf-3)
Clutch change (oem or stage 1?)
Get bren to do a cam cover
Will update as I go
How she stands


Right to get started I done the snapped droplink
As it was


New one


Tyres where ruined so changed the fronts for Bridgestone re04 and rear to nexan3000
How bad they were

Then I stripped her out for a BIG clean. Everything was removed except the main dash. I steam cleaned everything, hooverd everything and used the appropriate cleaning materials on floor and plastics. Even seats where done. Re wired all the shabby halfrauds wiring that had been done by previous owner as well.
Dog eaten it all!!!!

Stripped ready for cleaning (apart from carpet)


Run wires accordingly for stereo


iPod lead through centre

Cleaning and replacing
Half and half

Cleaning (love the slippers)

Replacing

Cleaned

All interior back in, only things to do Interior wise now is dash and door handles
Outside polish and wax (detail to be done by a detailing company when back on road)
Cleaning

Cleaned

More to come. Thanks for looking. Comments welcome
Last edited by Rambo on Sun Nov 27, 2016 4:54 pm, edited 3 times in total.